HOW TO ROAST A WHOLE FISH
Showing posts with label 101 Lessons. Show all posts
Showing posts with label 101 Lessons. Show all posts
Thursday, February 24
101 Thursday: How to roast a fish
I check The New York Times website every morning (in addition to waking up to The Today Show and listening to NPR on my commute) to have at least some idea as to what's going on in the world. Every now and then, the NY Times will grab my attention with some photos, giant header text, videos, etc. This week, they posted a video perfect for a FAFK 101 Thursday


Thursday, February 17
Thursday 101: Egg-ceptional Tips
We all know that eggs
are good for you: they're a great source of protein and good cholesterol.
But when buying eggs at the grocery store, I get so overwhelmed by all
the choices of eggs: organic vs. not; medium, large, or extra large; grade
A; brown vs. white; and then there are egg substitutes... you get the idea.
Well how do you make a choice? A recent Cooking Light article
answered just that - and just in time for a little 101 lesson on eggs.
The Incredible, Edible Egg:
Save money and buy the best eggs.

1. Real eggs vs. Egg substitutes
Winner: Real eggs
Apparently, egg substitutes are basically egg
whites with added food color. Egg subs are more expensive than whites
from whole eggs (nearly 2x the price!). Plus, once you open the
container, you better be ready to use them quickly because they'll spoil
quickly. But a dozen eggs can last up to 1 1/2 months in the fridge!

2. Brown eggs vs. White eggs
Winner: Tie
Brown eggs typically cost about 40% more than
white eggs, but brown eggs are identical to white eggs in terms of taste and
nutrition. So what makes a brown egg, well, brown? Brown hens lay
brown eggs--simple as that! Hens that
lay brown eggs are bigger, which means they have to eat more--therefore it
costs the farmer more to produce brown eggs and the cost is passed down to
the consumer.

3. Store brand vs. Name brand
Winner: Store brand
Once again, store brands win out. Store brand eggs have the same quality as
name brand eggs, but they're almost always less expensive. Go figure.
 |
| photo from here |
4. Famer's market vs. Supermarket
Winner: Supermarket
Many consumers assume that farmer's market eggs
are fresher, and they sometimes are. But
farmer's market eggs aren't subject to the same regulations as
commercially-produced eggs. Translation:
you don't know where those farmer's market eggs have been--have they been
washed and cleaned? Have they been
refrigerated? Eggs sold at the grocery
store have to be inspected and certified by the USDA (United States Department
of Agriculture)--meaning they're inspected, washed, transported in refrigerated
trucks, and shipped to the supermarket within 36-48 hours of being laid.
all images are from Cooking Light unless otherwise noted
Tuesday, January 11
It May Be Sleeting & Snowing in Chapel Hill, But It's NEVER Too Early to Start Thinking About Grilling Outdoors...
 |
| The view from my apartment patio... dreary and snowy and cold. |
Miss A and I aren't the most experienced grillers, so I figured it'd be best to begin brushing up on my grilling skillz and safety knwoledge.
I cam across this great blog, Cooking Outdoors, which has everything from proper grilling attire, fire pits, and patio furniture to proper grilling techniques and recommended sites.
The post about grilling safety tips piqued my interest and I learned a lot from it...
 |
| Click HERE for Cooking Outdoors Blog's safety tips for outdoor grilling... |
So here's to happy grilling and wishing it was summer, even though it's snowing and sleeting in NC and I have a snow day from work!
A great Beef Tagine over Couscous recipe is coming up soon...
Friday, December 3
Did You Know... A 101 Lesson on Random Food Facts
Here are a few random, yet fascinating facts about food. Many are bizarre, some are gross, but ALL are strangely fascinating...
 DID YOU KNOW
...that milk chocolate was invented by Daniel Peter, who sold the concept to his neighbor Henri Nestlé?
...TIP is the acronym for "To Insure Promptness"?
...there are more than 10,000 varieties of tomatoes and botanically speaking, a tomato is a fruit?
...the can opener was invented 48 years(!) after cans were introduced?

...carrots have ZERO fat?
...France exports 140 million bottles of champagne each year, but keep 180 million bottles for themselves?
...an onion, apple, and potato all have the SAME TASTE? The differences in flavor are caused by their smell!
...Americans eat 2x as much meat as Europeans (about 110lb per capita)?
 ...China uses about 45 BILLION chopsticks each year? That's about 25 million trees worth of chopsticks!
...Pepsi-Cola was invented by Caleb Bradham in 1890 as "Brad's Drink" as a digestive aid and energy booster? 8 years later, it was renamed Pepsi-Cola.
...watermelons, lettuce, tomatoes, and carrots are composed of over 90% water? (That's 97% for watermelons and lettuce, 95% tomatoes, and 90% for carrots.)

...tea was supposedly discovered in 2737 BC(!) by a Chinese emperor? Apparently some tea leaves accidentally blew into his pot of boiling water.
...to make 2.2 pounds of honey, bees have to travel a distance equal to 4 times around the earth to visit about 4 million flowers? (Thanks goodness for LOTS of bees!)
...in 1994 an artist from Chicago sent David Letterman a statue of Madonna, made of 180lb of ham?
 ...about 1 BILLION snails are served each year in restaurants? I know it's considered a delicacy when served as "Escargot," but I can't help it... EEW!
And finally, a few things you probably didn't know about caffeine and coffee.
Did you know that... coffee is the seed of a cherry from a tree? (The tree genus Coffea produces the cherry, hence the term coffee... logical.)
...that 1 cup of coffee has about 115mg of caffeine, but a caffeinated soda typically has between 23-36mg of caffeine? 1oz of chocolate has about 20mg and tea about 40mg.
So the best early morning stimulant... err, pick-me-up, is coffee! And if you're drinking a soda for the caffeine boost, you might as well eat a chocolate bar!
Happy Random Fact Friday (with a little bit of Thursday mixed in for a 101 lesson!)
Today I get to celebrate Miss A's and her twin sister Miss L's birthday... party food recommendations & recipes, yummy drink ideas, and mouth-watering baked goods to come!!
 DID YOU KNOW
...that milk chocolate was invented by Daniel Peter, who sold the concept to his neighbor Henri Nestlé?
...TIP is the acronym for "To Insure Promptness"?
...there are more than 10,000 varieties of tomatoes and botanically speaking, a tomato is a fruit?
...the can opener was invented 48 years(!) after cans were introduced?

...carrots have ZERO fat?
...France exports 140 million bottles of champagne each year, but keep 180 million bottles for themselves?
...an onion, apple, and potato all have the SAME TASTE? The differences in flavor are caused by their smell!
...Americans eat 2x as much meat as Europeans (about 110lb per capita)?
 ...China uses about 45 BILLION chopsticks each year? That's about 25 million trees worth of chopsticks!
...Pepsi-Cola was invented by Caleb Bradham in 1890 as "Brad's Drink" as a digestive aid and energy booster? 8 years later, it was renamed Pepsi-Cola.
...watermelons, lettuce, tomatoes, and carrots are composed of over 90% water? (That's 97% for watermelons and lettuce, 95% tomatoes, and 90% for carrots.)

...tea was supposedly discovered in 2737 BC(!) by a Chinese emperor? Apparently some tea leaves accidentally blew into his pot of boiling water.
...to make 2.2 pounds of honey, bees have to travel a distance equal to 4 times around the earth to visit about 4 million flowers? (Thanks goodness for LOTS of bees!)
...in 1994 an artist from Chicago sent David Letterman a statue of Madonna, made of 180lb of ham?
 ...about 1 BILLION snails are served each year in restaurants? I know it's considered a delicacy when served as "Escargot," but I can't help it... EEW!
And finally, a few things you probably didn't know about caffeine and coffee.
Did you know that... coffee is the seed of a cherry from a tree? (The tree genus Coffea produces the cherry, hence the term coffee... logical.)
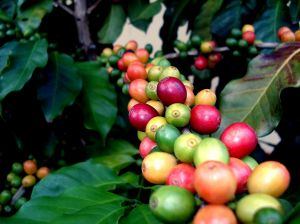 |
| An Indonesian coffea tree with cherries (the beans are inside!) |
...that 1 cup of coffee has about 115mg of caffeine, but a caffeinated soda typically has between 23-36mg of caffeine? 1oz of chocolate has about 20mg and tea about 40mg.
So the best early morning stimulant... err, pick-me-up, is coffee! And if you're drinking a soda for the caffeine boost, you might as well eat a chocolate bar!
Happy Random Fact Friday (with a little bit of Thursday mixed in for a 101 lesson!)
Today I get to celebrate Miss A's and her twin sister Miss L's birthday... party food recommendations & recipes, yummy drink ideas, and mouth-watering baked goods to come!!
Thursday, November 11
101 Thursday: My Favorite Italian Meet - Prosciutto (plus a recipe!!)
It's 101 Thursday again... and today it's all about PROSCIUTTO!!!
Prosciutto is the Italian word for ham, although us Americans use the word prosciutto to refer to a thinly-sliced, dry-cured ham. The meat is served uncooked in a style called prosciutto crudo in Italian, which distinguishes it from Italian cooked ham, prosciutto cotto.
 The best prosciutto comes from Italy, from central regions like Tuscany and Emilia Romagna, and from the northern regions like Friuli-Venezia Giulia and San Daniele. Prosciutto di Parma (prosciutto from the Parma province in Emilia Romagna)) is one of the most renowned Italian cities to produce some of the best and most expensive legs of prosciutto.
Prosciutto is from either a pig's leg or from a wild boar's thigh. I have always known that prosciutto was ham, and that ham comes from a pig; I was confused to read that it could also be from a wild boar. I have never really thought about wild boars in specifics, other than it's an animal, but didn't realize a wild boar is simply an uncastrated male swine, or pig. You learn something new everyday!
Back to the meat... prosciutto is a slow-cured meat and can take anywhere from 9 months to 2 years!! There are several types of prosciutto, each distinguished from the next by where and how the ham is produced. The European Union and Italian government have a similar protection agency as they do for Italian wines; the legislation has granted a special "protected designation of origin" to several of the raw hams, which are regulated to monitor the quality and processing of the ham.
The best, in my opinion, is Prosciutto di Parma, which is produced by over 200 curers in the Parma Province. Prosciutto di Parma is made from only large, fresh hams (26 - 30lbs). Although it's a salty meat, the curing process uses relatively little salt, but can also use garlic salt and sugar for a sweeter meat. After the meat is salted with sea salt, it is sealed with pig fat to slow the drying process. Curing occurs over a minimum of 12 months for certified Prosciutto di Parma and uses only salt--no nitrates, no spices, and no conserving substances. The ham is salted and left to settle for about 2 months; it is slowly pressed throughout the time to avoid breaking the ham bone, but simultaneously drain the meat. It is washed repeatedly to remove the salt and then hung in a dark and well-ventilated room. It is left to dry completely over time, then hung to air out in a controlled environment, or at room temperature, for up to 2 years!
Now, what do you do with prosciutto?
 Some of my favorite recipes are some of the easiest...
A new one that Ina Garten (The Barefoot Contessa) taught me is...
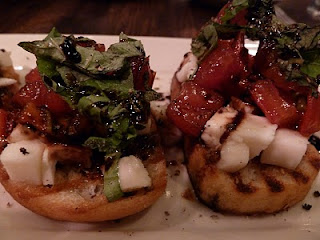
 GRILLED BREAD WITH PROSCIUTTO from her new cookbook, How Easy is That? In Italy, grilled bread rubbed in garlic is known as fettunta, which is the foundation of this recipe. The bread is at its ABSOLUTE BEST if you ACTUALLY GRILL IT OVER AN OPEN FLAME!! I know it's a little more annoying, but the charred taste it gets is incredible. (I tried to take pictures, but it's getting dark by 5:30pm here and the flash totally distorted the whole beauty of grilling the bread!) The bread is delicious on its own, but Ina shows how to put some prosciutto, mozzarella, and a drizzle of olive oil before putting it back in the oven (to melt the cheese, of course) and DELICIOZO! And seriously, could anyone mess that up?!?!
 makes 6 slices... perfect for an appetizer and filling enough for a small(ish) dinner for roomies!
Prosciutto is the Italian word for ham, although us Americans use the word prosciutto to refer to a thinly-sliced, dry-cured ham. The meat is served uncooked in a style called prosciutto crudo in Italian, which distinguishes it from Italian cooked ham, prosciutto cotto.

 |
| Salting the ham |
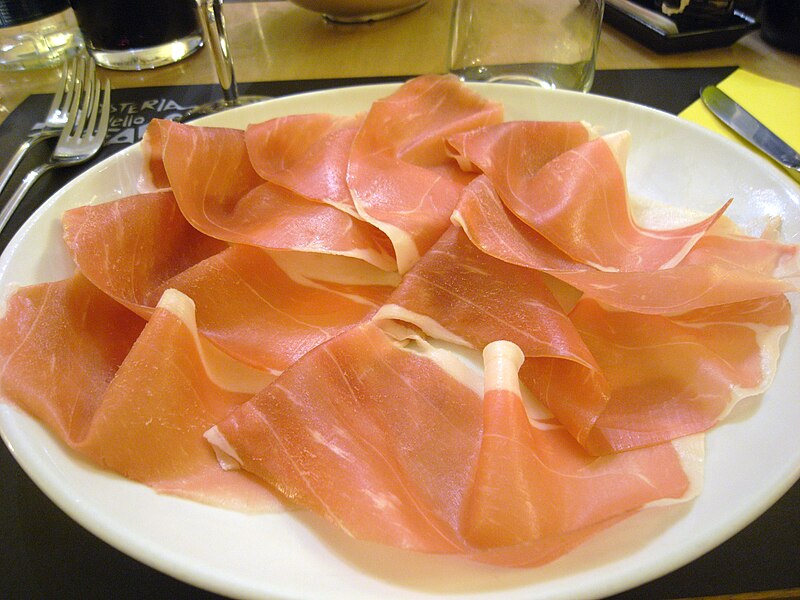 |
| Prosciutto di Parma |
 |
| Parma Province, in Emilia Romana, central Italy |
Now, what do you do with prosciutto?
 Some of my favorite recipes are some of the easiest...
- Try wrapping steamed or grilled asparagus in prosciutto...
- If you like tomato, basil, and mozzarella -- serve a sandwich on focaccia bread with T, B, & M plus prosciutto and good balsamic vinegar... my FAVORITE sandwich in the WHOLE WIDE WORLD!!
A new one that Ina Garten (The Barefoot Contessa) taught me is...
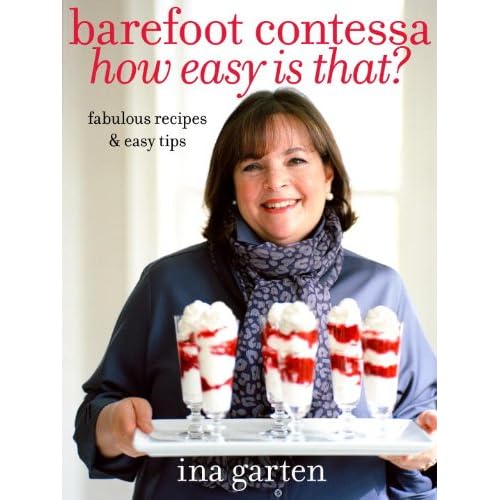 GRILLED BREAD WITH PROSCIUTTO from her new cookbook, How Easy is That? In Italy, grilled bread rubbed in garlic is known as fettunta, which is the foundation of this recipe. The bread is at its ABSOLUTE BEST if you ACTUALLY GRILL IT OVER AN OPEN FLAME!! I know it's a little more annoying, but the charred taste it gets is incredible. (I tried to take pictures, but it's getting dark by 5:30pm here and the flash totally distorted the whole beauty of grilling the bread!) The bread is delicious on its own, but Ina shows how to put some prosciutto, mozzarella, and a drizzle of olive oil before putting it back in the oven (to melt the cheese, of course) and DELICIOZO! And seriously, could anyone mess that up?!?!
GRILLED BREAD WITH PROSCIUTTO
 makes 6 slices... perfect for an appetizer and filling enough for a small(ish) dinner for roomies!
Ingredients:
6 slices of GOOD Tuscan round bread (sliced into 3/4-in thick slices)
2 large cloves of garlic (cut in half)
2 oz thinly sliced prosciutto, torn roughly into pieces
2 oz fresh mozzarella, grated**
3 tbsp minced fresh parsley
**the recipe calls for smoked mozzarella, but I have to admit that I HATE smoked mozzarella... so I took it upon myself to use fresh mozzarella and it was AMAZING!!! I didn't feel like anything was missing by substituting fresh mozzarella for smoked.
Preparation:
Prepare a charcoal grill with medium-hot coals (this is what I had access to at our apartment complex, but I want to try it at home in NY on our gas grill, which Ina suggests to prepare at medium-high heat).
Grill the bread for about 2 minutes on ONE side. Remove from the grill and place grilled side up on a platter
IMMEDIATELY (this is important) rub the grilled side of the bread with the cut side of a garlic clove. If you like, excuse me, LOVE garlic like I do, you can make it extra garlicky by using 2 cloves instead of 1 (like I did) and by rubbing the garlic fairly hard on the surface of the bread.
Drizzle the bread with the olive oil.

Place the torn prosciutto over the grilled, oiled, garlicked side of the bread and top with the grated mozzarella too!
Return the jazzed-up bread to the grill, cover the grill, and cook just long enough to melt the cheese and re-warm the toast (about 1-2 minutes). MAKE SURE to leave the vent open so that the fire stays lit.
This is EXCELLENT with a great glass of Chianti or a Super Tuscan red vino from Italy!
Sit back, sip your vino, and bite into a crunchy slice of delicious, hot, garlicky slice of Tuscan bread with mozz and prosciutto!
Thursday, November 4
101 Thursday: What Ingredients for Fall Cooking... Plus Baked Applesauce!!!
So it's been fall for quite a few weeks, I know, but North Carolina seems to be petitioning the season change. But this weekend is probably my favorite weekend of the year... FALL BACK WEEKEND!! An extra hour of sleep for free could not have come at a better time... this week has been exhausting!
With beautiful leaves changing colors and corn mazes and pumpkin patches and everything else wonderful about fall comes delicious foods only appropriate for autumn. So after studying my cookbooks for this past weekend full of family food feasts, I discovered Cooking Light's essential autumn produce to make seasonal foods. Cooking Light follows the philosophy of using the freshest fruits, vegetables, and herbs that you can so you have to do less to make the meal taste good. Although grocery stores have made traditionally seasonal produce available year round, you'll get better flavor and prices if you buy what's in season.
Here are a few of the highlights of cooking fresh by using seasonal produce:
 Ingredients:

 |
| My favorite tree on Davidson College's campus, right outside the library |
Here are a few of the highlights of cooking fresh by using seasonal produce:
| Fruits: | Vegetables: | Herbs: |
| apples | bell peppers | basil |
| clementines | broccoli | bay leaves |
| cranberries | brussels sprouts | parsley |
| figs | cabbage | rosemary |
| grapefruit | cauliflower | sage |
| grapes | eggplant | tarragon |
| kiwi | endive | thyme |
| kumquat | escarole | |
| mandarin oranges | fennel | |
| pears | frisée | |
| persimmons | leeks | |
| pomegranates | mushrooms | |
| quinces | parsnips | |
| tangerines | pumpkins | |
| red potatoes | ||
| rutabagas | ||
| sweet potatoes | ||
| winter squash |
So there may be a few unfamiliar foods in that list (at least to me)... maybe a quick photo lesson is in order before a quick autumn-appropriate recipe.
 |
| Kumquats (tiny citrus fruit) |
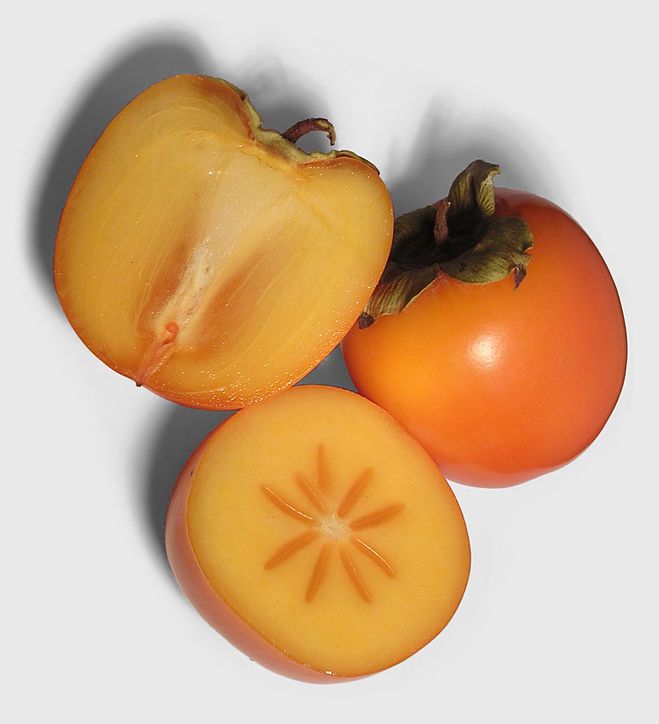 |
| Persimmons |
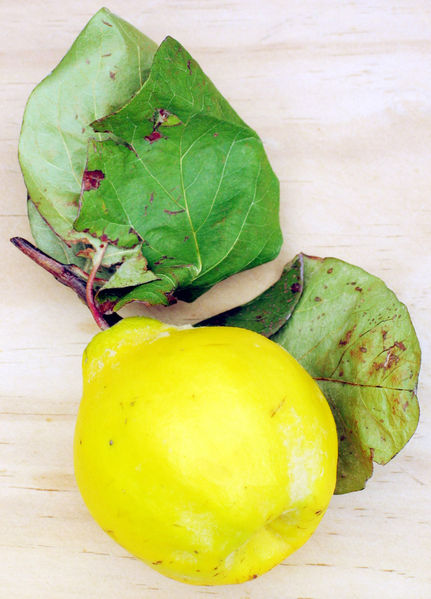 |
| Quince |
 |
| Escarole (broad-leaved endive) |
 |
| Frisée (curly-leaved endive) |
 |
| Rutabaga (yellow turnip) |
 |
| Tarragon |
My favorite food to enjoy during the crisp, fall months is anything made with apples: cider, apple pie, cider beer, applesauce, etc. Apples are super quick to cook and applesauce might be one of the first things I ever learned how to make; applesauce is a great accompaniment to turkey or pork too. So here's a variation of my favorite recipe for an easy applesauce that's sure to please everyone from 3 to 93.
Quick Autumn Awesomeness:
Easy Baked Applesauce
This will make about 8 servings (about 1/2 cup each)...
Best of all - you can make this up to 3 days ahead and keep it in the refrigerator!
 Ingredients:
5 tbsp water
1/4 cup packed brown sugar
2 tbsp fresh lemon juice
1 tsp ground cinnamon
4 lbs apples (peeled and cored; then cut into quarters and then halved)**
**I also like to mix apple varieties for both applesauce and pies -- typically half the amount of a sour flavor, like Granny Smiths, and half a sweeter flavor, like a Fuji or Gala.
Preparation:
Preheat oven to 375 degrees.
Combine all of the ingredients in a large Dutch oven (if you don't have one--use a large pot with a tightly-fitting cover or a casserole dish with a tightly-fitting aluminum foil lid) and toss to coat.
Cover and bake at 375 degrees for 1 hour and 15 minutes (or until apples are tender). I'd recommend stirring once, about halfway through the cooking time, around 45 minutes in.

Reheat before serving and sprinkle some cinnamon, nutmeg, and a little brown sugar on top for an extra zip of flavor! And if you're celebrating - pair with a good medium-bodied Chardonnay from California!
Thursday, October 21
A Dream is a Wish Your Heart Makes... My Dream Kitchen 101: Stocked & Organized
 |
| Look smart, Play smart (my soccer team, 2003) |
 |
| My club soccer teammates and I (circa 2002) showing off our cleats (the Patriots '87s) |
The absolute best investment you can make in your kitchen is a good set of knives. Think about how often you use knives in the kitchen--they're the only tool that I can honestly say I use every single time I'm in the kitchen! They're going to be expensive, but if you like cooking and want to cook well, they're well worth it. A good knife set is on almost every bridal registry list because of the price tag and they will last a lifetime if you take care of them. My parents still have the original knife set they got as a wedding gift in 1977 and have simply supplemented a few extras over the years! NEVER put your knives in the dishwasher--always hand wash them and dry them immediately. Taking care of your quality knives will insure they last forever! There are ranges of knife sets, from a great beginner set to a set worth of an Iron Chef; find what knives you use most and get a starter set with those plus a few extras, you can always build up your collection.
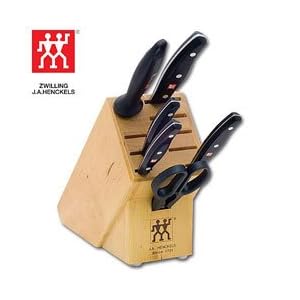 |
| A great starter set; Buy at Amazon.com, $119 (down from $269) |
 |
| Buy at Williams-Sonoma, $599.95 |
And I've secretly always wanted a cool, metallic knife rack so I could just grab what I needed. I mean how bad ass do they look?!
 |
| Buy at Williams-Sonoma, $39.95 |
When it comes to meat, wood cutting boards are king. Carving boards often have some type of "gripper" in the middle to keep the meat in place and a trough around the outside to keep the juices off your counter-top and on the cutting board. A good carving board can be expensive, but you should think of it as an investment in your knives and your kitchen; buy a reversible one and at least you can justify your the price tag!
 |
| Buy at Williams-Sonoma, $105 |
Wood cutting boards are great, but harder to keep clean and sanitary than plastic ones. You can go through cutting boards fairly quickly, so an investment isn't as important. I LOVE the plain Ikea plastic cutting boards that come in a variety of sizes, but I don't live as close to Ikea anymore, making it harder to get replacements. Sometimes the internet is a godsend, because Overstock.com has them in value packs, which are a no brainer when buying cutting boards (but you can snag them almost anywhere).
 |
| But at Amazon.com, $11.88 |
Mixing bowls are the number 1 thing I would recommend having multiples of in your kitchen artillery. You'll use them for EVERYTHING and manage to constantly be washing them if you cook often enough. I like to have multiple sizes and several of each size to make cooking, baking, and mixing as easy as possible. Williams-Sonoma can be overpriced for many things, but their mixing bowls are TO DIE FOR! Glass bowls are easy to keep clean and sanitary and look great in the kitchen. And surprisingly, this set is affordable!.
 |
| Buy at Williams-Sonoma, $38 |
Stainless steel mixing bowls are great to have in the kitchen too. They're incredibly durable and will last you a lifetime of cooking if you take decent care of them. I often find that mixing bowls can be slippery when I'm cooking, and this great set of bowls are big, deep, and even have a handle to make gripping a little easier. They're on the pricey side, but again, they're an investment in your kitchen.
 |
| Buy at Williams-Sonoma, $129.95 |
Another great, and more colorful, option are plastic bowls. The nesting kind make storage a cinch, plus you'll smile every time you see all the brilliant colors. Plus, this set comes with a colander and measuring cups too!
 |
| Buy at Chef's Resource, $49.95 |
 |
| But at Amazon.com, $12.09-$14.99 |
 |
| Buy at Amazon.com, $199 |
 |
| Buy at Chef's Resource, $33.95 |
 |
| Narrow spoons are great for fitting in spice jars; Buy at Chef's Resource, $12.95 |
I have never had good luck with blenders I've bought. They all say they're "great for smoothies" or "eats right through an apple for great juicing." Well I've never had either achievement. But Black & Decker not only makes tough outdoor electric tools, but a bad-ass blender too. This has the best ratings for shaving ice (GREAT for margaritas), makes great smoothies (went right through orange and banana peels during a test), and looks fabulous doing it all!
 |
| Buy at Black & Decker, $29 |
 |
| Buy at Bed, Bath & Beyond or Macy's, $19.99 |
 |
| Buy at Bed, Bath & Beyond, $299 |
Thursday, October 14
See, Sniff, Sip... Wine Tasting 101
 |
| Some of my favorite wines I had in Florence: Chianti, Brunello di Montalcino, and whites from Abruzzo |
 |
| An Italian Winery, outside Siena |
The 5 Things to Pay Attention to When Describing Wine:
Appearance, Aroma, Flavor, Body, and Finish
EXAMINE YOUR WINE
 First things first, pour your glass less than half-full and tilt your glass above a white tablecloth or napkin. You want to examine the COLOR of the wine; each wine will have its own unique color and appearance depending on the composition and ingredients. Some wines may look dull and boring at first glance and others may have a bright, seductive look. You want to look beyond white, red, or blush. A red wine might be described as maroon, purple, ruby, garnet, red, brick, or even brownish. Older red wines often have more orange tinges on the edges of color than a younger red. A white wine may be clear, pale yellow, straw-like, light green, golden, amber, or brown. Older white wines are darker than young white wines when compared with different ages of the same variety.
You want to pay attention to the CLARITY, or opacity, of the wine as well. Can you see right through it or is it murky? Is the wine watery or dark, translucent or opaque, dull or brilliant, cloudy or clear? Can you see any sediments? Typically you want the wine to be mostly clear; cloudiness can be a sign that there's a defect in the wine.

SMELL YOUR WINE
One of the most important qualities of wine is the AROMA. After you swirl your wine in the glass (about 10 seconds), take a quick whiff to get an initial impression. Then stick your nose right in the glass and inhale deeply through . Don't be shy, you really want to stick your honker right in the glass. Pay attention to the smells you pick up; the specific smells may be hard to distinguish or pinpoint at first, but the more wines you smell, the better you'll get at it. There are tons of adjectives used to describe the smell of wine and don't be afraid to really get creative with your descriptions. Do you smell oak, berry, flowers, vanilla, or citrus?
 Now why smell the wine? Why not just drink it? The best part of smelling the wine is the anticipation of the wine on your palate; the bold aroma should start to make your mouth water. Taste buds don't actually taste per-say, it's more like they feel. The tongue is an incredibly sophisticated muscle; the tongue is designed to have different areas to taste/feel specific sensations: the front of the tongue registers sweetness, the sides sourness, and the back of the tongue bitterness. Your taste buds also register salt, but salt is rarely a quality found in wine. When we taste, the flavors are actually the combination and feeling and smelling the wine.
TASTE YOUR WINE
 |
| Tuscan Wine Country, Motalcino |
The initial impression is the attack phase - alcohol content, tannins, acidity, and residual sugar are all analyzed by the taste buds in the initial taste. You typically don't taste one more than the other because a good wine should be well-balanced and the sensations will meld together to offer impressions in intensity and complexity, soft or firm, light or heavy, crisp or creamy, sweet or dry.
If you really want to taste with feeling, sip a little of the wine and just let it sit on your tongue for a few seconds, move the wine around your mouth and let it coat every part of your mouth before swallowing. If you let it sit in your mouth and truly taste it, you'll notice that the wine changes taste in each part of your mouth. The Evolution Phase, also called the mid-palate, is the wine's actual taste on the palate. This is where you try to distinguish the specific flavors or the wine. If it's a red wine, you first might note fruit tastes: berry, plum, prune, fig; or maybe a spice: pepper, clove, cinnamon; or maybe an earthy, woody flavor like oak, cedar, or even a detectable smokiness. A Shiraz might present berries up front, then to a spicy, almost cracked pepper flavor on the back of the tongue. The Evolution Phase of a white wine may present you with tastes of apple, pear, tropical or citrus fruits, or it may be more floral, honey, butter, herbs, or even a tinge of earthiness. A Pinot Grigio may present melon at the front of your palate and change to a citrus as it hits the center of your mouth.
The third phase, or the Finish, is how long the wine flavor impression lasts after it is swallowed. This is where the wine culminates and the aftertaste is vital. Texture is often used to describe the Finish and will also vary from wine to wine. This is where people often describe the body of the wine. Red wines might be full-bodied and pack a serious punch from the highest tannin (and often alcohol) amount of all the wines like a Bordeaux from France, a Cabernet from California, or an Italian Super Tuscan. Another red wine might be light-bodied and go down smoothly, like a Beaujolais Nouveau, a young red from France. Tannins are responsible for the feeling of "body" to the wine. There are also medium-bodied reds that will have more tannins than a light-bodied wine, but it won't have nearly the same high-power taste like a Merlot, Shiraz, or delicious Chianti from Tuscany.
 |
| Some of my wine classmates (Il Professore Mario is 3rd from the left) |
The success in wine tasting is taking your time. Take the time to appreciate the wine and you'll begin to distinguish and understand the subtleties of wine. If you're really into wines, understanding them, and trying new ones, it's helpful to keep a little journal or record of your tastings. If you like the wine, write down the wine's name, producer, and vintage year so you have it for future reference. Keep track, learn to taste the subtleties and try not to drink your wine without tasting and appreciating it. It's a great excuse to sit down and unwind after a long day or a nice Friday night in with A, a cheese plate, and a movie.
Happy Sipping!
Subscribe to:
Posts (Atom)